
Search the Community
Showing results for tags 'yakima'.
Found 17 results
-
 I installed a set of Yakima landing pads (landing pad 7) and control towers with 58" crossbars on my Cmax friday and yesterday (about 6 hours total, probably much less if I had to do it again). A bunch of fully captioned/descriptioned pictures are in an album in my media area, but I'll use the first post of this thread to do a full writeup of it. Most of the details are already in the captions, and I'll copy and expand on them here. [EDIT 3/1/14: The water tightness got tested in the latest rain storms that we finally got in SoCal this week. No sign of leakage at all] A few relevant details: Front Bar location: centered 11" back from the rear edge of the windshield glass Rear Bar location: centered 34" back from the center of the front bar (45" back from the windshield) Pad distance in from gutters (measured from center of the inner gap between the rubber and metal to the edge of the pad): about 0.5" (needs to be checked again, and probably should be a little further in to avoid internal roof structure pieces if you don't want to drop the headliner). The distance from the gutter edge to the hole centers is about 1.5" Most of it wasn't too difficult, but I took it pretty slow because it's a lot of disassembly (headliner) and some irreversible metal mods (drilling holes) in a brand new car. Here are the pictures, in order (I should have done step by step of the headliner teardown/reassembly, too, but didn't...) For removing the headliner, I started at the back and just yanked on the trim pieces (trying to pull near fasteners as I could feel them). I didn't fully remove any of the trim pieces-- most were left hanging by a lower clip. The overhead mounted stuff (handles, visors) all come out with Torx T15 screws, but be careful with the springy handles-- they can be tricky to manage on reassembly. All the screws were the same size, though I kept them with their trim pieces just in case. Reassembly went front to back, and is basically massaging pieces into place, making sure clips align with holes, then pressing. The tools: pencil masking tape measuring tape small flat bladed screwdriver T15 torx driver touch up paint hammer center punch (to set drill hole locations) electric drill 1/8" drill bit 1/4" drill bit 25/64" drill bit deburring tool drill stops (made from PVC pipe) flexible video inspection scope (useful, not required) Headliner down from behind: Headliner down from the front, along the edge: Pics of things that can interfere with the install: Holes marked and punched: Holes drilled and the deburring tool. Use a hard drill stop like the PVC pipe I used. With larger drill bits, they can screw in and push a wrap of tape before you know it's happened (happened once, but with the headliner down it didn't cause any trouble). I gave them 0.25-0.5" to drill with. The sheet metal is thin, so 1/4" is plenty. Holes touched up with paint: Blind nuts (one installed, one on roof): Blind nuts-- I had to install in this orientation and then turn, and in some cases reach underneath to turn the nut in the carrier to avoid the internal rail. Two of them butted against the rail and deformed the carrier before I realized that's what was happening, so I had to insert the nuts from underneath by hand for those two (dropping them and looking for where they slid in the rails was very time consuming-- details in the picture descriptions). The next steps I didn't photograph because it's kind of messy with the silicone RTV, but it's exactly as described in the Yakima instructions: put a bead of silicone RTV (included with the landing pads) across the top of the nut gasket, then install the landing pad (thin base and plastic upper) over it and tighten. For the ones I had to insert from underneath by hand, it was easiest to partly drop the bolt in and then reach underneath to feel the bolt location with the nut. Here are close ups of the loose nuts. If you have to install them loose, the asymmetric side that's flat around the threaded hole faces the sheet metal: This is the back of the nut- it's symmetric and rounded around the threaded hole. This side faces away from the sheet metal: Front crossbar installed, with tape marking the center location so I can locate the rear bar: Almost finished-- all installed but I still have to reinstall the headliner.
- 15 replies
-
- 2
-

-
- yakima
- landing pad
- (and 2 more)
-
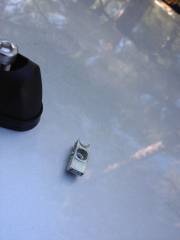
From the album: yakima rack install
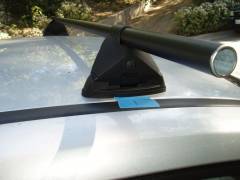
A closeup of the front crossbar after installation. I marked the center with a mark on tape so I could locate the rear crossbar with respect to it. -
From the album: yakima rack install
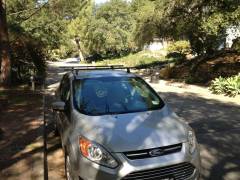
Here's an almost finished picure of the installation. You can see that the overhead console and visors are still hanging down because I haven't replaced the headliner yet. -
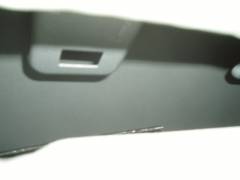
From the album: yakima rack install
I think this is one of the beam at the front that the visors mount to (you can see the edge of the clip for the free end of the visor). -
From the album: yakima rack install
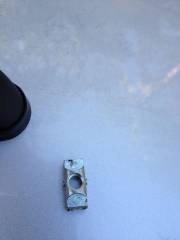
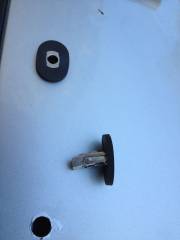
Here's a picture of one of the nuts that separated from the carrier. If they separate and you have to insert them by hand, this side (with symmetric cutouts) faces down away from the sheet metal. -
From the album: yakima rack install
Here's a picture of one of the nuts that separated from the carrier. If they separate and you have to insert them by hand, this side (with asymmetric cutouts) faces up against the sheet metal. -
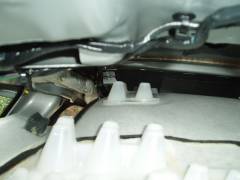
From the album: yakima rack install
Another view of the inside roof, showing how there are various ledges a little below the roof that can interfere with the blind nut insertion. -
From the album: yakima rack install
Another view of the inside roof, showing how there are various ledges a little below the roof that can interfere with the blind nut insertion. -
From the album: yakima rack install
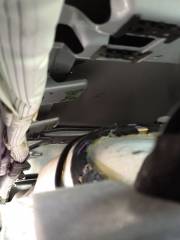
A view inside the space between ceiling and headliner from the back. You can see the side curtain airbag on the left, and the big crossbeam that limited the bar spacing running across the roof. -
From the album: yakima rack install
Another view inside the headliner. You can see the rolled up airbag in the foreground, and the handle mounts above it. -
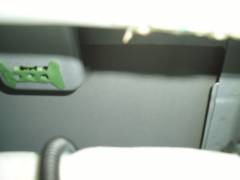
From the album: yakima rack install
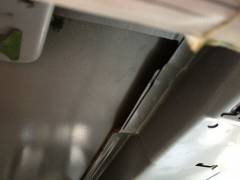
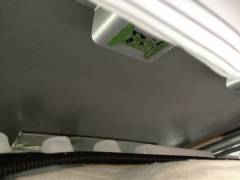
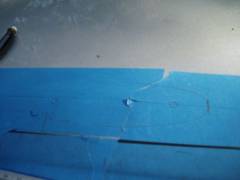
This is a view from front to back along the inside edge with the headliner dropped. You can see the side curtain air bag rolled up, and the mounts for the passenger visor (black clips in front) and the passenger roof handles (green clips). Further back you can see the cross beam that's 45" back from the windshield glass that limited how far back the rear rail could go. The mounts hang from a rail that's about 1/2" (just big enough for fingers to reach in) below the roof. When I dropped the nuts that separated from their carriers, one ended up in the "basin" by the clips for the passenger visor. the other ended up trapped between the roof and a beam that runs above the basin (not visible without a scope). I had to use the video scope to find and recover it. -
From the album: yakima rack install
In order to clear the rail, I inserted the nuts as seen in the one that's partially inserted and then turned them. A few of them I had to reach in and rotate the nut in the carrier from underneath as I was inserting them. After they're through the roof and rotated in the carrier, I turned them so the long edge of the gasket runs front to back. -
From the album: yakima rack install
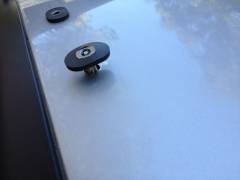
A pair of the blind nuts supplied by yakima. One is installed, and the other is set up for installation-- they insert vertically and then rotate in the carrier. The rails and beams inside the roof can interfere with this insertion, and was the main difficulty I ran into. Two of the nuts came out of the carriers (after running into the front to back rail) and I had to insert them by hand from underneath while dropping the bolt in. -
From the album: yakima rack install
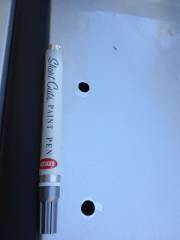
As recommended in the yakima instructions, I touched up the bare metal with paint. Since it will never be seen I just used a paint pen from the hardware store. -
From the album: yakima rack install
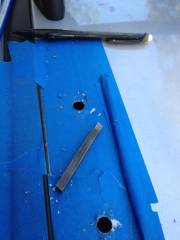
The holes drilled to the final 25/64" and the lathe tool I used for deburring. -
From the album: yakima rack install
This shows the holes marked and punched on the masking tape. I installed the front bar centered 11" back from the rear edge of the windshield glass. There are internal mounts for the overhead handles directly underneath, but the bolt holes for the landing pad go immediately in front of and behind it. The rear bar is centered 34" behind the front bar. The outside edge of the landing pads is about 0.5" from the inside edge of the gutter (measured to the center of the gap between the rubber and metal). There's a large internal cross beam slightly further back that kept me from going to 36"-- both internal beams would interfere with installation of the blind nuts (the nuts have to insert and rotate). There's also a pair of internal rails that run front-to-back along both sides that can interfere with insertion of the nuts. I'd probably go another 1/4" or more in from the gutter if I had to do it again. -

From the album: yakima rack install
All the tools I used for the installation, except for the hammer (used to drive the punch): pencil masking tape measuring tape (I used two- a soft flexible one that's good for measuring along the roof, and a metal retractable one) small flat bladed screwdriver (for removing and flipping various screw covers) T15 torx driver (all the accessories that have to be removed for the headliner drop are T15) touch up paint hammer center punch (to set drill hole locations) electric drill 1/8" drill bit (pilot holes) 1/4" drill bit (intermediate size) 25/64" drill bit (final size, specified by yakima) deburring tool (I used a lathe tool) drill stops (made from PVC pipe - extra pipe and cutter shown) flexible video inspection scope (useful, not required)