chrisl
-
Posts
81 -
Joined
-
Last visited
-
Days Won
1
Content Type
Profiles
Forums
Gallery
Everything posted by chrisl
-
I was going to suggest exactly that... It should be pretty easy to just stick a resistor in series to limit the current. Just make sure you pick one that can handle whatever power it has to dissipate. On a "cold" (I live in LA, it's never really cold) morning I can stand "1" for about 20 minutes. My girlfriend will run it on 5, but she's cold if the outside temp is less than 100F.
-
Finally! It would be nice if existing Sync systems could be upgraded to this, but I don't have much hope. It's been obvious for a while that the best way to do the car/smartphone interface is just to use the touchscreen as a display and touchscreen input for the phone. The development lifecycle on phones is much faster than on cars, so any nav or entertainment system that comes with a new car will generally be a couple generations behind what your current phone has. And the car will rapidly fall behind the phone.
-
I've noticed this as well- first I noticed that when I got home it would be almost full charge (maybe one row of pixels short), then I'd get in the car the next day and it would be full. I attributed this to temperature - it can get pretty cold overnight here, even if it's warm during the day. Lately, I've been starting the car to leave work and seeing it around 2/3 charge, despite an extended EV+ range as I get into work (as I notied in another thread, I have an EV+ location about a mile before work because I stop for coffee regularly). I had been thinking that I just wasn't watching the battery level, but now I'll watch more closely to see if it's a real effect.
-
I have the hybrid with no nav features and it absolutely does have and use EV+. It recognizes at least 3 locations-- mine currently has home, work, and the coffee shop about a mile before work. Conveniently, that gives me an extended EV+ range as aI get to work (typically stop for coffee then drive to work, but sometimes drive all the way in), since it starts to EV as I approach the coffee shop and then will continue all the way to work as long as I don't accelerate too hard. It's dead flat between them. On the way home, EV+ is useful and kicks on on the steepest (~10%) stretch of uphill as I approach home. If I keep it under 25 mph, I can make it all the way up. I then have a slightly longer and shallower downhill from the crest to the driveway, so I arrive at home with about a 50% charge. Before EV+ recognized home, it would typically be full charge when I hit the driveway (from coasting down the hill to my house).
-
I haven't really noticed it in SoCal. I did see a Cmax yesterday that had all the badges except the Ford oval removed from the back, though.
-
I live at the bottom of a small hill that's at the top of a big hill, and after about 4300 miles I've come to accept that the ICE will almost always turn on when going up even a small hill. There are a few exceptions: - If I need a little juice to maintain speed getting to the top of an exit ramp, I can light foot it and do it EV only - as I approach home, the EV+ kicks in and I can go up a very steep (~10+% grade) for about 1/3 of a mile entirely in EV mode if I keep it under 25 mph. EV+ is good here, because as soon as I crest the hill, I have a downhill that charges the HVB back up to a bit over halfway. Before EV+ figured out where I live, I'd always pull into the driveway with a full charge. It would be nice if there were a way to set EV+ to kick in a little farther out, because I know that once I crest the hill from any direction, I have a nice downhill recharge to my driveway.
-
Thule racks with panoramic roof
chrisl replied to valkraider's topic in Cargo, Hauling, Roof Racks & Towing
No experience with the Thule, but I had a yakima clamped onto my previous car for 13 years (removed only a couple times in that time) and once you wipe off the dirt that accumulates around the feet you can't tell there was a rack there. You just have to make sure the roof and the feet bottoms are clean before you put it on. -
Installing Yakima Landing Pads and Control Towers
chrisl replied to chrisl's topic in Cargo, Hauling, Roof Racks & Towing
The Thule racks are nice, and I would definitely have done that if I was starting from scratch, but I already had a bunch of yakima fork mounts that are round bar only and would have been $$$ to replace if I switched to a Thule system. I would have preferred to get a yakima clamp on system, but they've been stubbornly not making clips available for the C-max. Drilling the roof didn't bother me much-- I keep cars until they're completely used up, and on my last car (a saturn wagon), I actually removed the factory rack to install yakima a yakima clip on rack because it had a higher weight rating and wider bars. It left a bunch of threaded rivets in the roof that I just filled with screws sealed with RTV and I never had a problem with water in ~13 years. -
I never got the warning and have been plugging my iPhone (4S with iOS 5.X) into the USB a few times a day since mid November and haven't had any issues with MFT at all. As in zero. I got the MFT because I'd used sync without it and it made me crazy. I figured that it might be flaky, but they'd probably get it worked out. I've been pleasantly surprised that it does exactly what it's supposed to do and doesn't do anything flaky. I try Sirius once in a while, but it never holds my attention very long.
-
Unfortunately you have a slightly different combination of hardware and software than I do, but I do normally use the USB connection for the music and it works fine. I have a 4S on iOS 5.something and my normal operating mode is to plug the USB cable into the phone for the music, and it seems to use the bluetooth connection for the phone activity. I've never had a problem with it linking up in either mode. It does seem to always start on the same song if I leave it in random mode, but if it was playing something when I turned off the car or unplugged, it will pick up where it left off. I also have a 16 GB USB stick that I copied my music onto that I leave plugged in, in case I forget the phone or someone else is using the car. It plays music off that just fine, as well-- if the music isn't DRM'd you can just copy it to a cheap USB stick and leave it plugged in. I wouldn't upgrade an iphone 4 to iOS 7-- it might fix one problem at the cost of making the phone mostly unusable. I didn't upgrade to 6 because of the maps issues, and then 7 is enough generations away that I expect it will kill the battery life and make the phone slow.
-
Installing Yakima Landing Pads and Control Towers
chrisl replied to chrisl's topic in Cargo, Hauling, Roof Racks & Towing
had to be kind of odd looking on the Trans Am! -
Installing Yakima Landing Pads and Control Towers
chrisl replied to chrisl's topic in Cargo, Hauling, Roof Racks & Towing
A Trans Am would be a totally different story... For me, the car is primarily a way to keep the rack off the ground and haul it around. The Cmax does it comfortably and efficiently, but it's still mostly about getting bikes around. I tried to wait for Yakima to come out with clips, but got impatient. And it would have been $$$ to replace all my stuff with thule compatible mounts. And since it will never really come off anyway, I think it looks better with the permanent towers. -
I had a Yakima rack with Q-towers on two different cars over the last 20 years, and when you take it off and wipe off the dirt rings you can't tell there was ever a rack there. I just put landing pads and control towers on my SE because I'd have to replace a lot of fork-mount bike carriers if I switched away from round bars.
-
Installing Yakima Landing Pads and Control Towers
chrisl replied to chrisl's topic in Cargo, Hauling, Roof Racks & Towing
I think it will be fine with load-- I can shake the car up and down by the rack without any visible wiggling of the roof. A little further inboard and it would be visible. That's how I picked the distance from the gutters- the roof is very stiff close to them, though the proximity to the internal rails made installation a bit of a pain. With the 58" bars, the risk is that I can put a lot more stuff on top... 2-3 bikes plus a space case. The wind noise is quite audible at 70+mph -- I have three bike mounts on it now and there's a lot of wind noise on the highway, even without bikes on it. I'll probably add a fairing to it to see if it helps with the noise. I've had a similar setup, but with Q-towers and clips for the past 20 years or so, but the cars it was on were so noisy (plymouth sundance and a saturn wagon) that the wind noise wasn't really noticable. As far as gas mileage-- my commute is a mix of surface streets and stop-and-go, with about 8 miles of carpool lane in the middle, so it didn't look like it affected the mileage much today. The rack can be removed, leaving little pods (that have smooth covers) for comparison, but I'll probably keep it on most of the time. It has little effect in city traffic, and when I go on long trips I tend to have a lot of bikes. -
Every cellphone is trackable, and to a large extent is tracked. Phones switch from tower to tower all the time, and the phone company can get your location by the relative signal strength at various towers, even if it didn't have a GPS. Virtually all phones now also have a GPS receiver in them (whether they give you the data or not) because it's extremely cheap and provides a good clock reference.
-
I did my rack install friday and saturday, and took some pics with the headliner all the way down. They're in my media section and in this post: http://fordcmaxhybridforum.com/topic/3406-installing-yakima-landing-pads-and-control-towers/ along with a description of the removal.
-
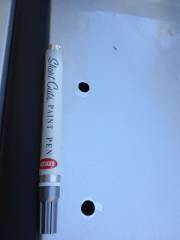
I installed a set of Yakima landing pads (landing pad 7) and control towers with 58" crossbars on my Cmax friday and yesterday (about 6 hours total, probably much less if I had to do it again). A bunch of fully captioned/descriptioned pictures are in an album in my media area, but I'll use the first post of this thread to do a full writeup of it. Most of the details are already in the captions, and I'll copy and expand on them here. [EDIT 3/1/14: The water tightness got tested in the latest rain storms that we finally got in SoCal this week. No sign of leakage at all] A few relevant details: Front Bar location: centered 11" back from the rear edge of the windshield glass Rear Bar location: centered 34" back from the center of the front bar (45" back from the windshield) Pad distance in from gutters (measured from center of the inner gap between the rubber and metal to the edge of the pad): about 0.5" (needs to be checked again, and probably should be a little further in to avoid internal roof structure pieces if you don't want to drop the headliner). The distance from the gutter edge to the hole centers is about 1.5" Most of it wasn't too difficult, but I took it pretty slow because it's a lot of disassembly (headliner) and some irreversible metal mods (drilling holes) in a brand new car. Here are the pictures, in order (I should have done step by step of the headliner teardown/reassembly, too, but didn't...) For removing the headliner, I started at the back and just yanked on the trim pieces (trying to pull near fasteners as I could feel them). I didn't fully remove any of the trim pieces-- most were left hanging by a lower clip. The overhead mounted stuff (handles, visors) all come out with Torx T15 screws, but be careful with the springy handles-- they can be tricky to manage on reassembly. All the screws were the same size, though I kept them with their trim pieces just in case. Reassembly went front to back, and is basically massaging pieces into place, making sure clips align with holes, then pressing. The tools: pencil masking tape measuring tape small flat bladed screwdriver T15 torx driver touch up paint hammer center punch (to set drill hole locations) electric drill 1/8" drill bit 1/4" drill bit 25/64" drill bit deburring tool drill stops (made from PVC pipe) flexible video inspection scope (useful, not required) Headliner down from behind: Headliner down from the front, along the edge: Pics of things that can interfere with the install: Holes marked and punched: Holes drilled and the deburring tool. Use a hard drill stop like the PVC pipe I used. With larger drill bits, they can screw in and push a wrap of tape before you know it's happened (happened once, but with the headliner down it didn't cause any trouble). I gave them 0.25-0.5" to drill with. The sheet metal is thin, so 1/4" is plenty. Holes touched up with paint: Blind nuts (one installed, one on roof): Blind nuts-- I had to install in this orientation and then turn, and in some cases reach underneath to turn the nut in the carrier to avoid the internal rail. Two of them butted against the rail and deformed the carrier before I realized that's what was happening, so I had to insert the nuts from underneath by hand for those two (dropping them and looking for where they slid in the rails was very time consuming-- details in the picture descriptions). The next steps I didn't photograph because it's kind of messy with the silicone RTV, but it's exactly as described in the Yakima instructions: put a bead of silicone RTV (included with the landing pads) across the top of the nut gasket, then install the landing pad (thin base and plastic upper) over it and tighten. For the ones I had to insert from underneath by hand, it was easiest to partly drop the bolt in and then reach underneath to feel the bolt location with the nut. Here are close ups of the loose nuts. If you have to install them loose, the asymmetric side that's flat around the threaded hole faces the sheet metal: This is the back of the nut- it's symmetric and rounded around the threaded hole. This side faces away from the sheet metal: Front crossbar installed, with tape marking the center location so I can locate the rear bar: Almost finished-- all installed but I still have to reinstall the headliner.
- 15 replies
-
- 2
-

-
- yakima
- landing pad
- (and 2 more)
-
Pics from installation of Yakima Landing Pads and Control Towers
-
-
From the album: yakima rack install
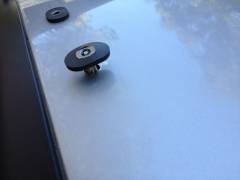
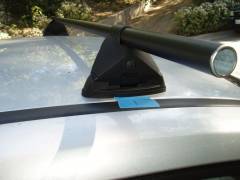
A closeup of the front crossbar after installation. I marked the center with a mark on tape so I could locate the rear crossbar with respect to it. -
From the album: yakima rack install
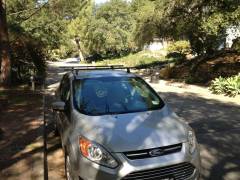
Here's an almost finished picure of the installation. You can see that the overhead console and visors are still hanging down because I haven't replaced the headliner yet. -
From the album: yakima rack install
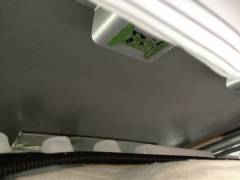
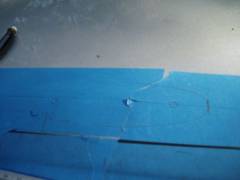
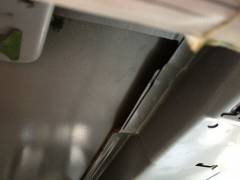
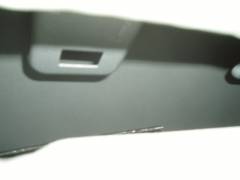
I think this is one of the beam at the front that the visors mount to (you can see the edge of the clip for the free end of the visor). -
From the album: yakima rack install
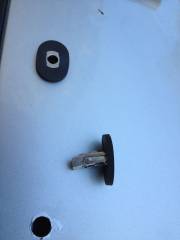
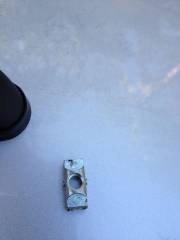
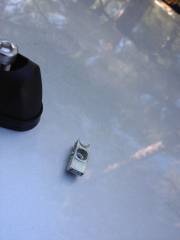
Here's a picture of one of the nuts that separated from the carrier. If they separate and you have to insert them by hand, this side (with symmetric cutouts) faces down away from the sheet metal. -
From the album: yakima rack install
Here's a picture of one of the nuts that separated from the carrier. If they separate and you have to insert them by hand, this side (with asymmetric cutouts) faces up against the sheet metal. -
From the album: yakima rack install
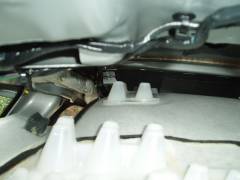
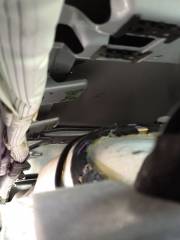
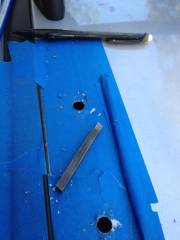
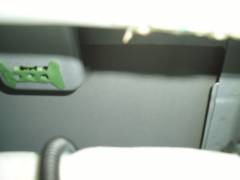
Another view of the inside roof, showing how there are various ledges a little below the roof that can interfere with the blind nut insertion. -
From the album: yakima rack install
Another view of the inside roof, showing how there are various ledges a little below the roof that can interfere with the blind nut insertion.